





Apply the SLES 15 STIG Safely with OpenSCAP

Use SUSE’s supported STIG profile to scan SLES 15, test remediation, review remaining findings, and retain assessment evidence.
By default, Android or iPhone will automatically update applications on the phone so that you can use the latest features of the application. However, not all new versions of the application you want to download, or automatic updates of Android applications will consume a lot of data. If so, we can turn off automatic updates of applications on Android like turning off automatic updates of applications on iPhone . Below are instructions to turn off Android application updates for all applications or just the applications you want.
How to turn off automatic Android app updates
Step 1:
First, you access the Google Play Store and then click on the account avatar in the top right corner of the interface. Switch to the new interface, click on Settings to adjust again.

Step 2:
In the interface as shown, we continue to click on Network Priority Selection . Then you will see the option to Automatically update applications to change the settings on Android.
Step 3:
Now you see 3 different settings for automatic Android app updates. To turn off automatic Android app updates, tap Don't auto-update apps , then tap OK to save.
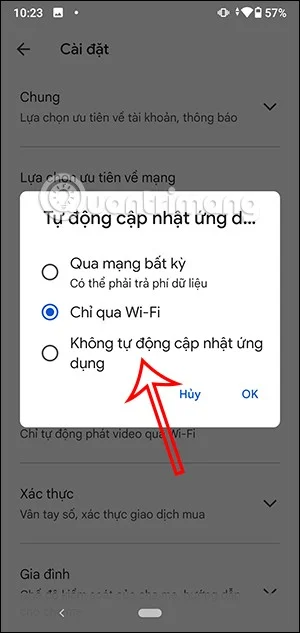
This way all the apps and games installed on your Android phone will no longer be updated automatically.
How to turn off automatic updates for specific apps on Android
In case you only want to turn off automatic updates of some specific applications, we also make adjustments in Google Play Store.
Step 1:
Also at the Google Play Store interface, we enter the name of the application that we do not want to update automatically. Then click on the application found below.

Step 2:
We click on the application to access the information of this application. In the interface as shown, the user clicks on the 3 dots icon in the top right corner of the screen.
Step 3:
At this point, the user will see the Enable automatic updates setting . We will uncheck this option to not update the new version only for this application.
Use SUSE’s supported STIG profile to scan SLES 15, test remediation, review remaining findings, and retain assessment evidence.
Trace a failed Cockpit connection through DNS, port 9090, the systemd socket, firewalld, TLS, and login settings using current SUSE guidance.
Create a redundant Ethernet connection on SLES 15 with YaST and Wicked, configure active-backup bonding, and verify both ports and failover.
Turn an existing SLES 15 system into a reviewed AutoYaST profile, validate it, and use it to deploy a test server with fewer manual steps.
Install the SLES 15 KVM and libvirt tools, enable the right host service, and configure selected virtual machines to start after a reboot.
Use systemd jobs and the previous boot journal to locate a slow service, mount, or storage dependency, then correct it without masking the cause.
Use firewall-cmd to inspect the active zone, allow HTTP safely, preserve SSH access, and verify that the rule survives a reload on SLES 15.
Trace a PAM failure to its service, account policy, or identity provider, then repair the right SLES configuration while preserving a working admin session.
Trace a failed kernel module at SLES startup, correct an obsolete boot entry or repair the required driver, and verify the next boot.
Prepare SCSI SAN paths, enable multipathd, inspect SUSE’s hardware defaults, and verify stable device maps without guessing array settings.