Instructions for leaving the Zalo chat group on phones and computers

Zalo chat group is a place where we can text and call many people at the same time. However, after participating in the group chat, we feel that the group has some members who often text and bother us and want to leave the group chat but don't know what to do1?

When you exit the group, you will no longer receive messages from other group members. Today, Download.vn invites you to follow the article on how to leave the Zalo group on computers and phones .

Instructions for exiting Zalo group chat on the phone

Step 1: First open the Zalo application on your phone, then access a group conversation that you want to leave.

Step 2: In the group chat, click on the three dashes icon in the upper right corner of the screen.

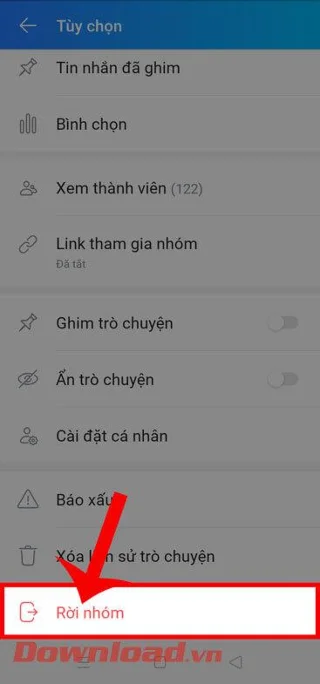
Step 3: Swipe the screen down, then click on Leave group .

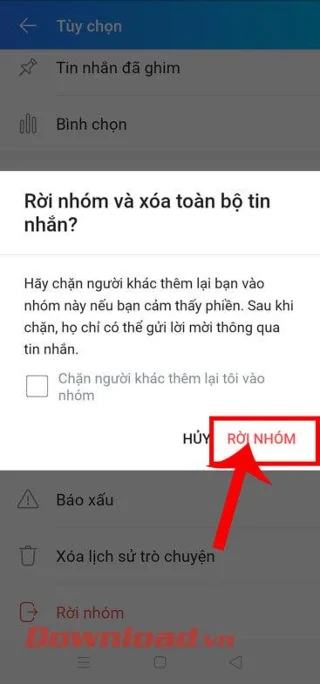
Step 4: At this time, the screen will display the message " Leave the group and delete all messages?" ”, tap the Leave group button .

Instructions for leaving the Zalo chat group on phones and computers Instructions for leaving the Zalo chat group on phones and computers Instructions for leaving the Zalo chat group on phones and computers

Instructions for leaving Zalo chat group on computer

Step 1: First, open Zalo on your computer , then go to a group chat that you want to leave.

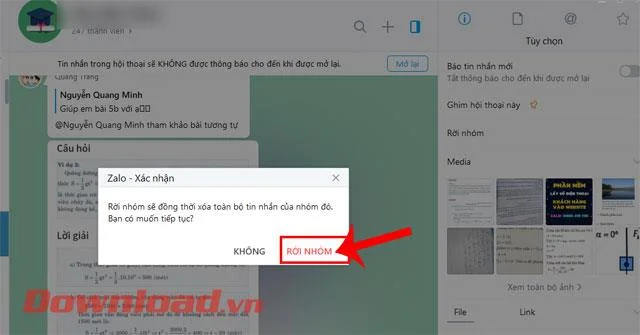
Step 2: In the group conversation, click on Leave group in the Options window on the right side of the screen.

Step 3: At this time, a " Confirmation " notification window will appear on the computer screen , click the Leave group button .

Instructions for leaving the Zalo chat group on phones and computers

Wishing you success!

Leave a Comment

Enable FIPS Mode on SLES 15 and Verify the Boot State

Enable FIPS Mode on SLES 15 and Verify the Boot State

Follow SUSE’s SP7 procedure to enable FIPS mode, reboot safely, verify the active policy, and check whether your compliance requirement calls for validated modules.

Set Up a LUKS-Encrypted Data Volume on SLES

Set Up a LUKS-Encrypted Data Volume on SLES

Compare YaST and cryptsetup for a new encrypted SLES data volume, choose LUKS1 or LUKS2, and verify unlock and mount behavior safely.

Build a Custom AppArmor Profile on SUSE Linux

Build a Custom AppArmor Profile on SUSE Linux

Create, refine, and verify a least-privilege AppArmor profile on SLES 15 SP7, with a clear note on SLES 16’s SELinux default.

Build a Local SUSE Update Server with RMT on SLES 15

Build a Local SUSE Update Server with RMT on SLES 15

Set up RMT on SLES 15, mirror entitled repositories, and verify HTTPS registration and package access from a test client.

Join SLES 15 to Active Directory with SSSD in YaST

Join SLES 15 to Active Directory with SSSD in YaST

Connect SLES 15 to AD with YaST’s SSSD-based logon management, then verify directory lookup, domain login, and Kerberos tickets.

Enable SLES Live Patching and Verify a Kernel Fix

Enable SLES Live Patching and Verify a Kernel Fix

Set up the right Live Patching path for SLES 16.0 or 15 SP7, apply eligible kernel fixes, and confirm what is active without confusing it with a reboot-required kernel update.

Install and Sign Custom Kernel Modules on SLES 15 Secure Boot

Install and Sign Custom Kernel Modules on SLES 15 Secure Boot

Load a custom SLES 15 kernel module without disabling Secure Boot. Match the running kernel, sign the .ko file, enroll a MOK key, and verify loading.

Keep Services Available During a SLES 15 SP5 to SP6 Upgrade

Keep Services Available During a SLES 15 SP5 to SP6 Upgrade

SLES 15 SP5 can migrate online to SP6, but each node must reboot. Use a tested rolling upgrade or blue-green cutover to keep workloads reachable.

Apply the SLES 15 STIG Safely with OpenSCAP

Apply the SLES 15 STIG Safely with OpenSCAP

Use SUSE’s supported STIG profile to scan SLES 15, test remediation, review remaining findings, and retain assessment evidence.

Restore Cockpit Access to SUSE Linux Enterprise Server

Restore Cockpit Access to SUSE Linux Enterprise Server

Trace a failed Cockpit connection through DNS, port 9090, the systemd socket, firewalld, TLS, and login settings using current SUSE guidance.