Install and Sign Custom Kernel Modules on SLES 15 Secure Boot

Load a custom SLES 15 kernel module without disabling Secure Boot. Match the running kernel, sign the .ko file, enroll a MOK key, and verify loading.
Many people are familiar with This PC being placed on the Desktop by default, but in Windows 11, this software is hidden. Refer to the article to learn how to bring This PC to the Desktop on Windows 11.
Table of Contents
This PC acts as a storage place for all local drives including hard drives, CD drives, and any USB devices connected to your computer. On some versions of Windows, This PC is also called My Computer. Normally, this application will appear by default on the Desktop, but from Windows 11 you will no longer see it appear on the Desktop.
This will make many Windows 11 users feel inconvenient and uncomfortable during use. However, there is still a way for you to "get back" This PC (My Computer) to return to Desktop on Windows 11. Below are some ways you can apply.
Step 1: Open Settings via the Start menu . You can also press Windows + I on your keyboard to open it quickly.
Step 2: Select Personalization in the left toolbar of the new window that appears, then select Themes in the right section.
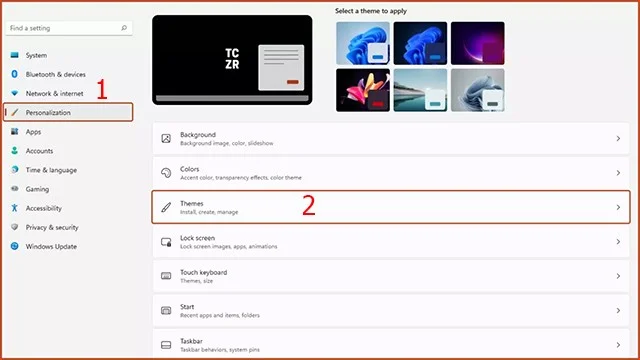
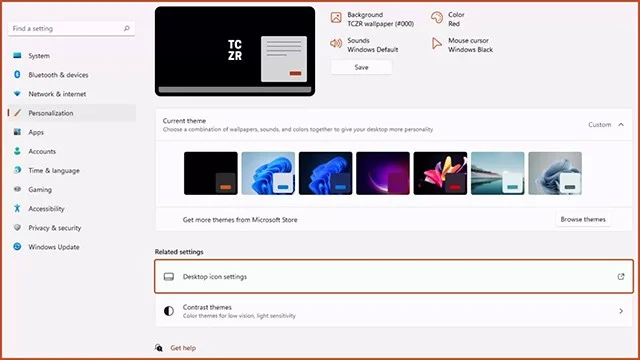
Step 3: Click Desktop icon settings in the Related Settings section.
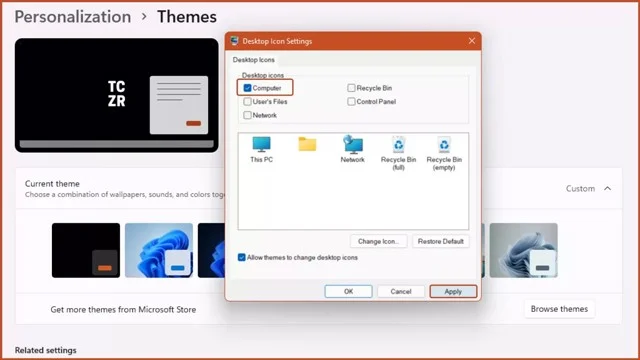
Step 4: The Desktop Icon Settings window appears. You need to tick the Computer line and select Apply. Through this operation, the This PC icon will reappear on the Desktop as usual.
Step 1: Open any folder on your computer.
Step 2: Click the Restore button at the top right of the opened folder to minimize the folder interface.
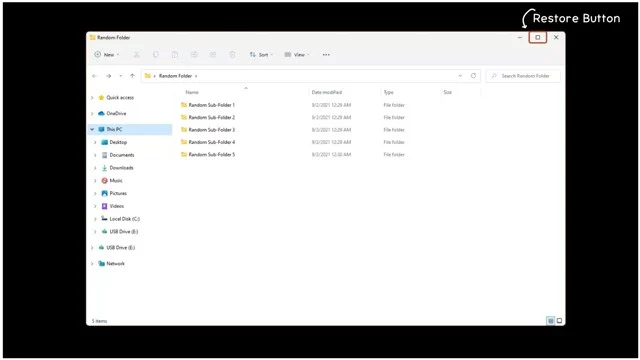
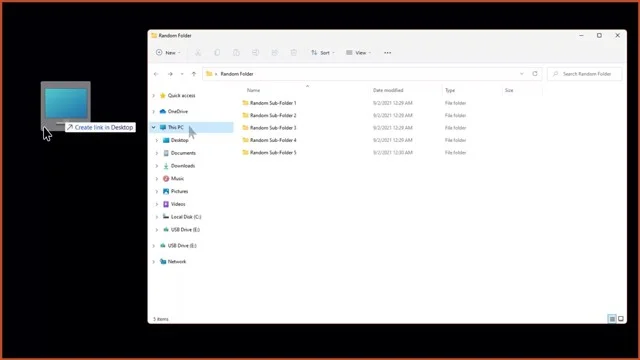
Step 3: You will see the This PC icon in the left bar of the folder window. Click on the This PC icon, then hold and drag it to the Desktop and release. The This PC shortcut will appear on your Desktop.
The last way to help you bring This PC to the Desktop is through Control Panel.
Step 1: Access Control Panel in the Start menu.
Step 2: Type File Explorer Options into the search bar on the top right of Control Panel.
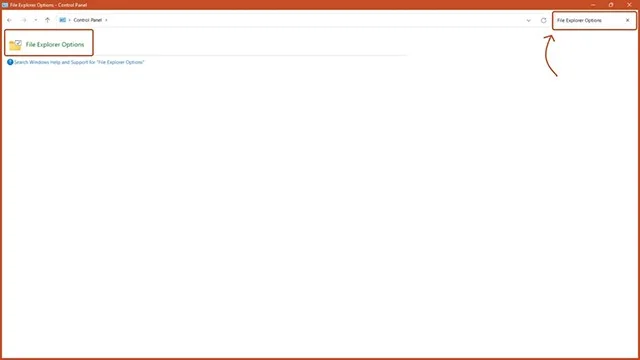
Step 3: The File Explorer Options window appears.
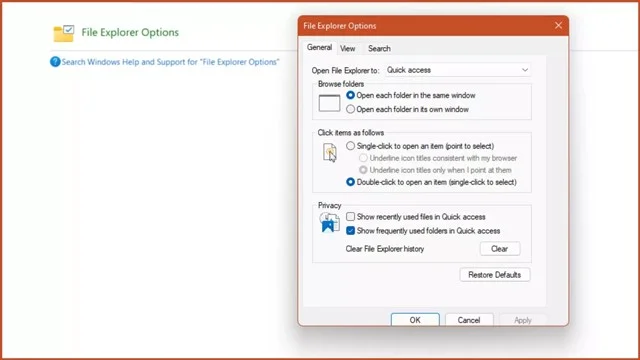
Step 4: In the General tab, in the Open File Explorer to section , click This PC and then Apply.
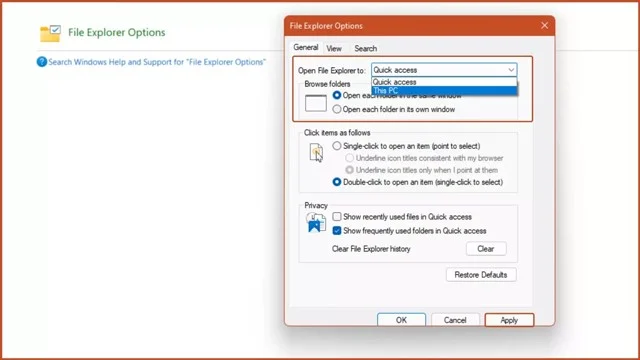
Step 5: Press the Windows + E key combination and the This PC window will appear.
Note that if you don't do the above steps, the Windows + E key combination will launch File Explorer by default.
So you have been able to grasp 3 ways to bring This PC or My Computer to the Desktop on Windows 11. Hopefully this trick will help you more conveniently in the process of using Windows 11 operating system.
Load a custom SLES 15 kernel module without disabling Secure Boot. Match the running kernel, sign the .ko file, enroll a MOK key, and verify loading.
SLES 15 SP5 can migrate online to SP6, but each node must reboot. Use a tested rolling upgrade or blue-green cutover to keep workloads reachable.
Use SUSE’s supported STIG profile to scan SLES 15, test remediation, review remaining findings, and retain assessment evidence.
Trace a failed Cockpit connection through DNS, port 9090, the systemd socket, firewalld, TLS, and login settings using current SUSE guidance.
Create a redundant Ethernet connection on SLES 15 with YaST and Wicked, configure active-backup bonding, and verify both ports and failover.
Turn an existing SLES 15 system into a reviewed AutoYaST profile, validate it, and use it to deploy a test server with fewer manual steps.
Install the SLES 15 KVM and libvirt tools, enable the right host service, and configure selected virtual machines to start after a reboot.
Use systemd jobs and the previous boot journal to locate a slow service, mount, or storage dependency, then correct it without masking the cause.
Use firewall-cmd to inspect the active zone, allow HTTP safely, preserve SSH access, and verify that the rule survives a reload on SLES 15.
Trace a PAM failure to its service, account policy, or identity provider, then repair the right SLES configuration while preserving a working admin session.