Schedule Reliable Backups for ONLYOFFICE Workspace

Set a backup destination, schedule, Mail coverage, and retention limit in ONLYOFFICE Workspace, then verify the archive is ready to restore.
When using Word software to design tables or edit documents, users often encounter a situation where they have to repeatedly edit table titles on each page. So how can it be done quickly without multiple edits. Right now, WebTech360 will guide you how to set up repeating titles in Word for tables and printing .
The article was done on a Windows 10 laptop with the Word 2019 version, you can also perform the same operations on the Word 2013 version, 2019, in addition, the article also guides you how to do it on the Word version. Word 2016, 2013, 2010…
I. Benefits of repeating titles in Word
II. How to repeat titles in Word 2019, 2016, 2013, 2010, 2007
The three versions of Word 2013, 2016 and 2019 have almost the same interface, so the implementation of repeating the title will also be the same.
1. Quick Guide
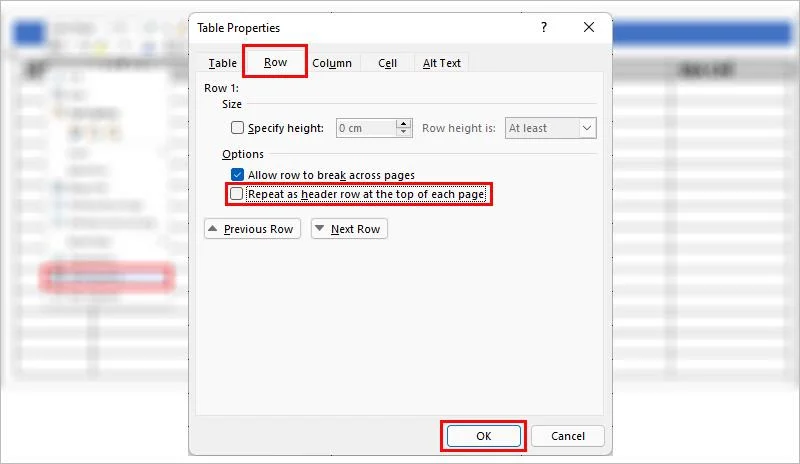
Open the Word file you want to repeat the title > Highlight and right- click the header row you want to repeat > Select Table Properties... > The Table Properties dialog box displays, select the Row tab > Check the box Repeat as header row at the top of each page > Click OK .
2. Detailed instructions.
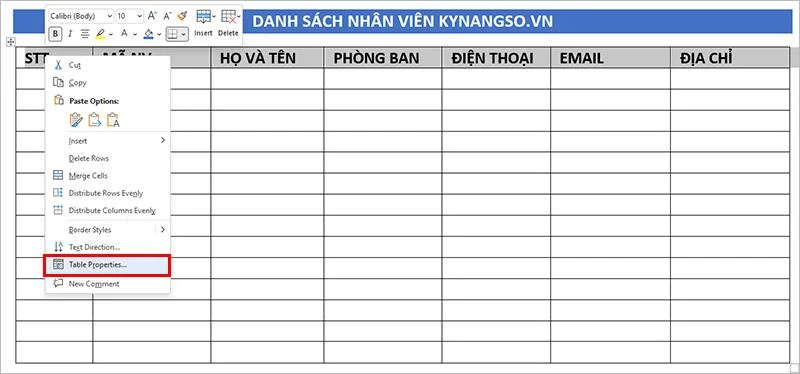
For example, you have a Word table with the title as shown below. This table has data in multiple pages. Without repeating the title, the data on other pages will not have information to refer to. If you do it manually, it will definitely take a lot of time. So we need to use trick to duplicate the table header.
Step 1: Open the Word file where you want to repeat the title > Highlight the subject line you want to repeat.
Step 2: Right-click on the highlighted line and select Table Properties…
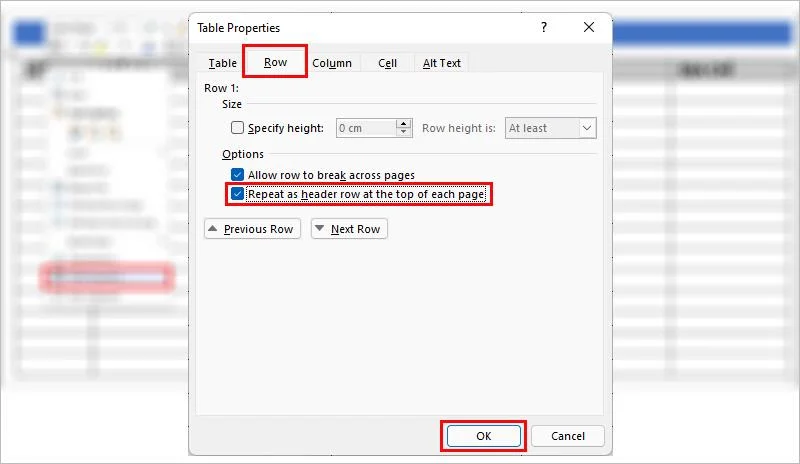
Step 3: The Table Properties dialog box appears, select the Row tab.
Step 4: Check the box Repeat as header row at the top of each page and click OK.
IV. How to remove title repetitions in Word
This title de-duplication operation can be done on different versions of Word with the same operation, below I use the Word 2016 version to guide you.
Step 1: Open the Word file with the title repeated > Highlight the title you want to remove.
Step 2: Right-click on the highlighted part and Select Table Properties…
Step 3: The Table Properties dialog box displays, then select the Row tab.
Step 4: Uncheck the box Repeat as header row at the top of each page and click OK .
Epilogue.
Above is how to repeat the title in Word for tables, print the most details, help users easily make tables quickly. If you have any questions about how, please leave a comment below. Hope the article is useful to you. Good luck!
Explore more:
Set a backup destination, schedule, Mail coverage, and retention limit in ONLYOFFICE Workspace, then verify the archive is ready to restore.
Start the Enterprise Docker Compose stack, persist its license and data, configure JWT safely, and confirm the editors are ready to integrate.
Use an ONLYOFFICE JavaScript macro to remove nonprinting characters and trim extra spaces from a defined spreadsheet range, with a safe review workflow.
Connect ONLYOFFICE DocSpace to Active Directory or OpenLDAP, import users and groups safely, map account fields, and schedule reliable synchronization.
Move portal data from Disk Default to a supported cloud storage provider, or relocate Docker data safely by changing its host volume mapping.
Identify whether Document Server uses a Linux package or Docker, remove only its components, and check remaining data without deleting shared services by mistake.
Trace slow collaborative editing to Docker resource pressure, proxy connections, or document load, then choose the fix that matches your measurements.
Install custom fonts in ONLYOFFICE Document Server, compare persistent Docker mounts with direct copies, rebuild the font list, and verify the result.
Choose where TLS should terminate, mount a trusted certificate and private key safely, and verify HTTPS access to a Dockerized ONLYOFFICE Docs server.
Embed the ONLYOFFICE editor in your PHP app, sign its configuration with JWT, and save edited files through a secure callback.