How to enable/disable app access to Generative AI in Windows 11

Starting with Windows 11 build 26236 (Canary), Microsoft added a new Generative AI section to the Privacy & security settings page . The new Generative AI section allows you to see if an app can use Generative AI features.

This guide will show you how to allow or deny apps access to Generative AI, for your account or all users in Windows 11 .

Method 1: Enable/disable app access to Generative AI for all users in Settings

Note : You must be logged in as admin to use this option.

1. Open Settings ( Win + I ).

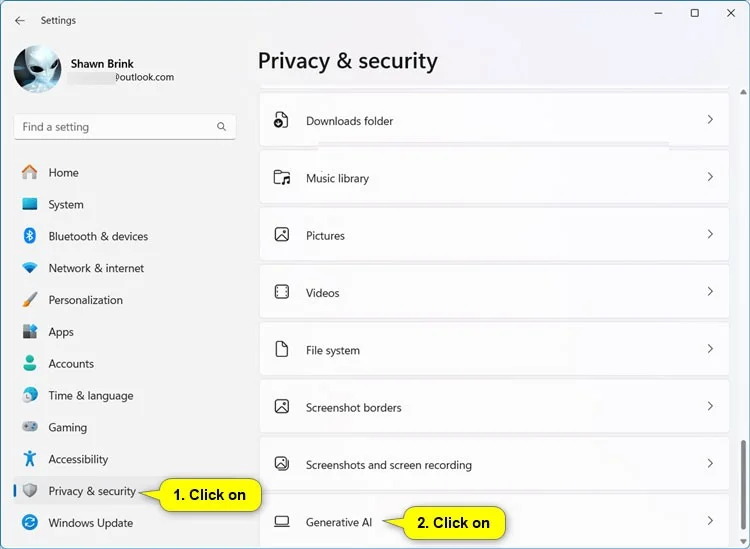
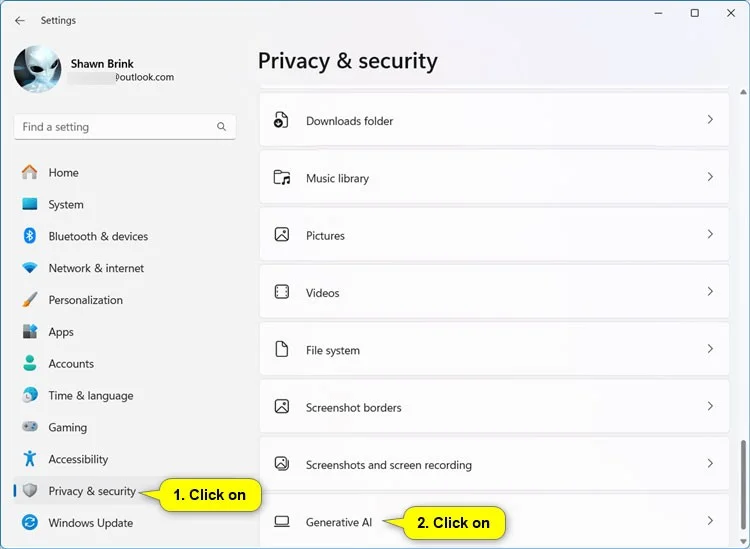
2. Click Privacy & security on the left and tap Generative AI on the right under App permissions .

How to enable/disable app access to Generative AI in Windows 11

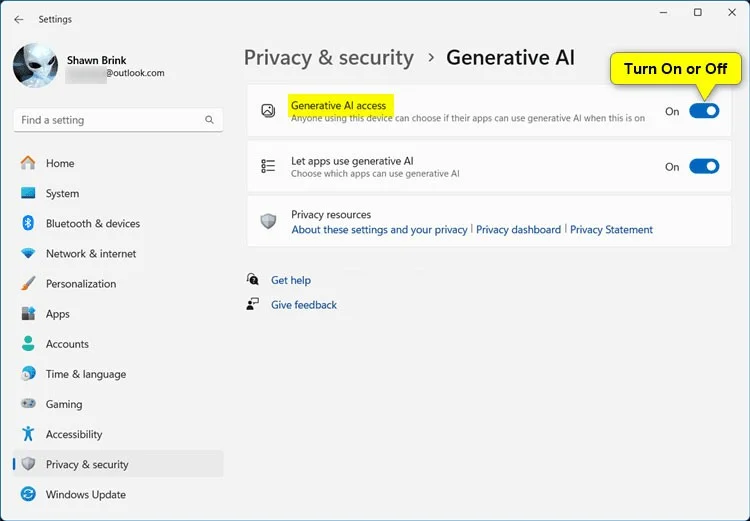
3. Enable (default) or disable Generative AI access depending on what you want.

How to enable/disable app access to Generative AI in Windows 11

4. Now, you can close Settings if you want.

Method 2: Enable/disable app access to Generative AI for the current user in Settings

1. Open Settings ( Win + I ).

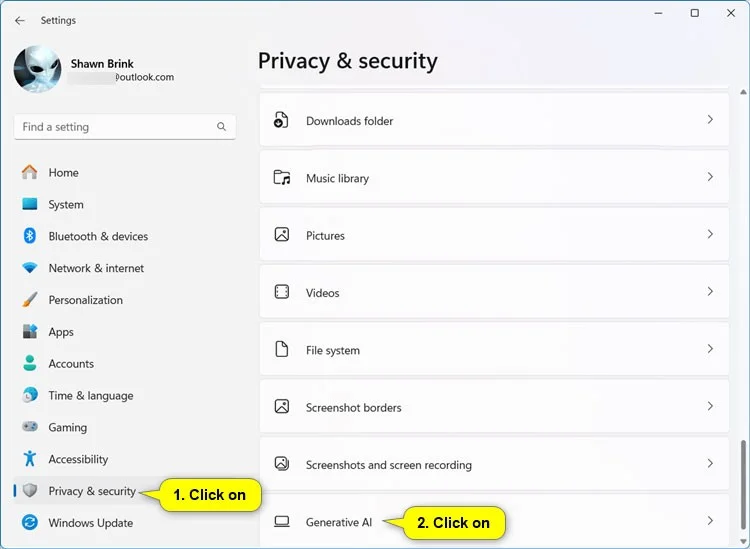
2. Click Privacy & security on the left and tap Generative AI on the right under "App permissions".

How to enable/disable app access to Generative AI in Windows 11

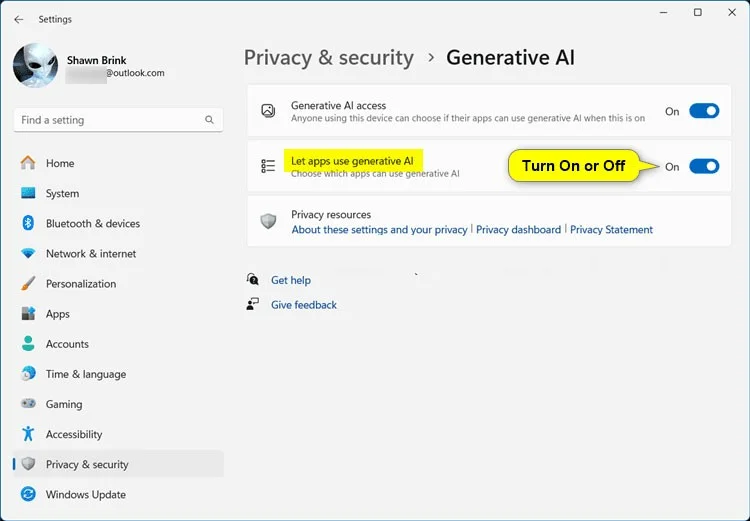
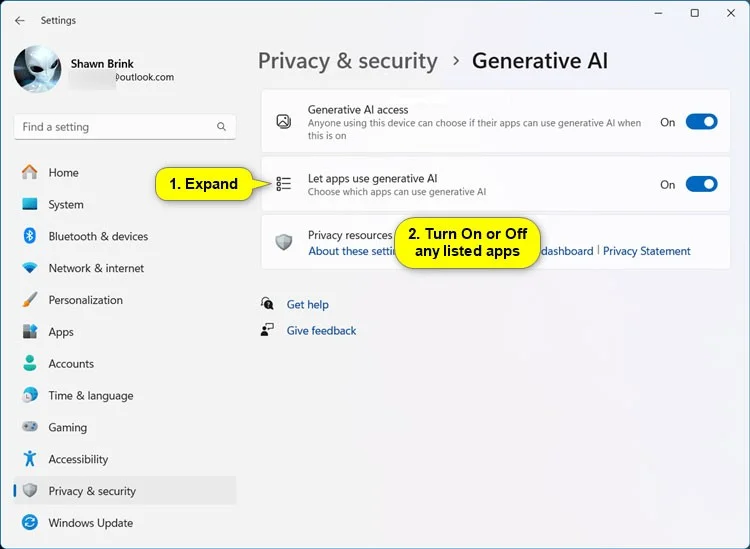
3. Turn on (default) or off Let apps use generative AI depending on what you want.

How to enable/disable app access to Generative AI in Windows 11

4. Now, you can close Settings if you want.

Method 3: Enable/disable access to specific apps to Generative AI for the current user in Settings

1. Open Settings ( Win + I ).

2. Click Privacy & security on the left and tap Generative AI on the right under "App permissions".

How to enable/disable app access to Generative AI in Windows 11

3. Click Let apps use generative AI to expand if possible.

4. Enable (default) or disable any available apps you want.

How to enable/disable app access to Generative AI in Windows 11

5. Now, you can close Settings if you want.

Method 4: Enable/disable application access to Generative AI for all users in Local Group Policy Editor

Note : You must be logged in as admin to use this option.

Local Group Policy Editor is only available in Windows 11 Pro, Enterprise, and Education editions.

1. Open Local Group Policy Editor (gpedit.msc).

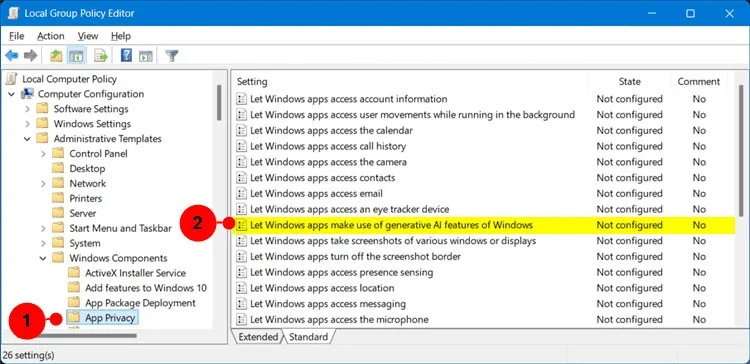
2. Navigate to the policy location below in the left pane of Local Group Policy Editor.

Computer Configuration > Administrative Templates > Windows Components > App Privacy

How to enable/disable app access to Generative AI in Windows 11

3. In the right pane of App Privacy in Local Group Policy Editor, double-click the Let Windows apps make use of generative AI features of Windows policy to edit it.

4. Perform step 5 (on), step 6 (off), or step 7 (default) below as desired.

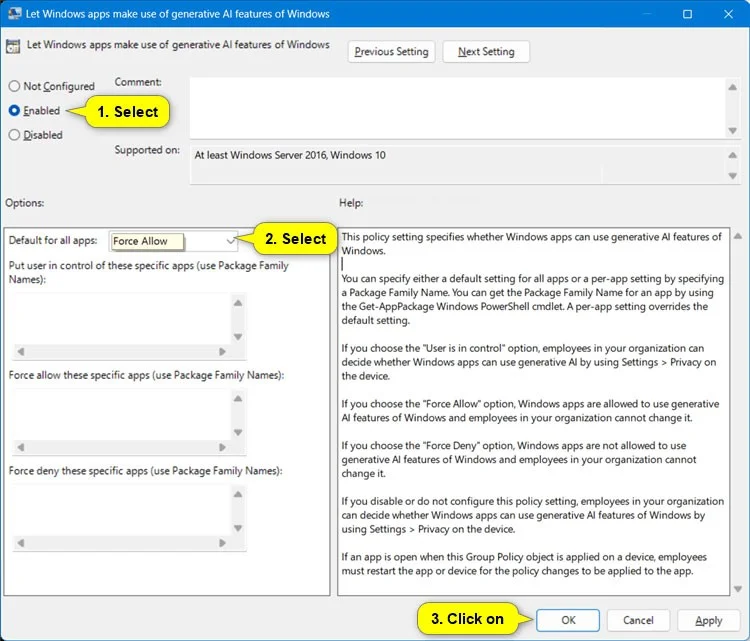
5. Always allow apps to access Generative AI for all users

A) Select Enabled.

B) Select Force Allow in the "Default for all apps" drop-down menu in Options.

C) Click OK and move to step 8 below.​

How to enable/disable app access to Generative AI in Windows 11

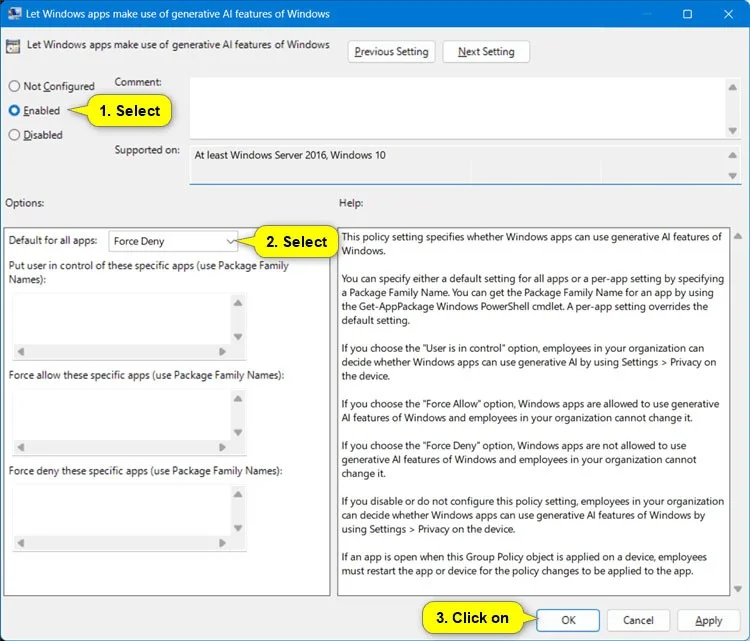
6. Disable app access to Generative AI for all users

A) Select Enabled.

B) Select Force Deny in the "Default for all apps" drop-down menu in Options.

C) Click OK and move to step 8 below.

How to enable/disable app access to Generative AI in Windows 11

7. User-selected default apps access Generative AI

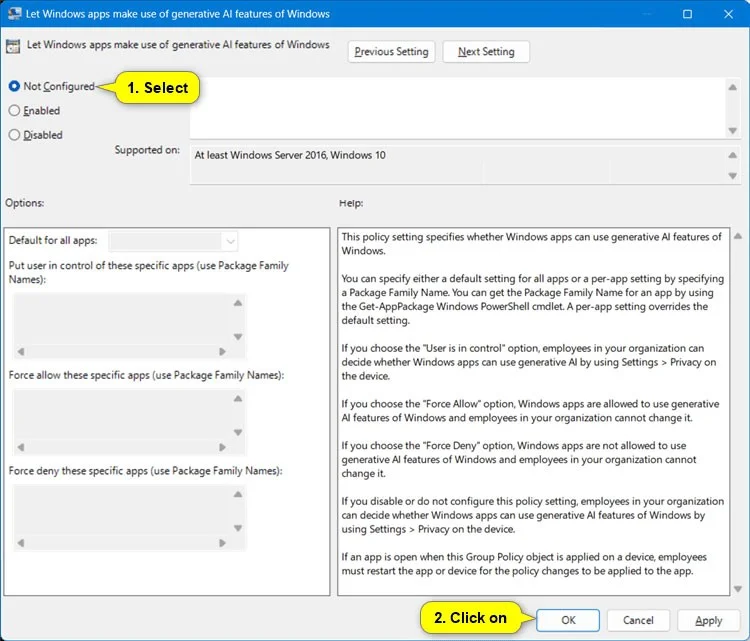
A) Select Not Configured.

B) Click OK and move to step 8 below.

How to enable/disable app access to Generative AI in Windows 11

8. Now, you can close Local Group Policy Editor if you want.
Leave a Comment

Reduce Ubuntu 24.04 Audio Distortion with Targeted ALSA Tweaks

Reduce Ubuntu 24.04 Audio Distortion with Targeted ALSA Tweaks

Trace whether clipping, ALSA format conversion, or HDA power saving is causing Ubuntu 24.04 audio distortion, then apply the matching reversible fix.

Build a PipeWire Output Toggle Script That Moves Active Audio

Build a PipeWire Output Toggle Script That Moves Active Audio

Switch Debian audio between named PipeWire outputs with a pactl script that updates the default sink and reroutes streams already playing.

Restore Bluetooth Headset Microphone Input on Ubuntu 24.04

Restore Bluetooth Headset Microphone Input on Ubuntu 24.04

Get your Bluetooth headset mic working by selecting the right input, using a hands-free audio profile, and checking Ubuntu’s PipeWire route.

Fix Flatpak Apps Not Respecting GTK Themes in Ubuntu 24.04

Fix Flatpak Apps Not Respecting GTK Themes in Ubuntu 24.04

Learn why Flatpak apps may ignore Ubuntu 24.04 GTK themes and follow safe steps to check theme extensions, refresh Flatpak apps, and diagnose portal issues.

How to Dual-Boot Ubuntu 24.04 and Windows 11 With BitLocker Enabled

How to Dual-Boot Ubuntu 24.04 and Windows 11 With BitLocker Enabled

Install Ubuntu 24.04 alongside Windows 11 with BitLocker safely. Compare separate-drive and shared-drive paths, recovery keys, partitioning, and boot checks.

How to Fix Nvidia Drivers Not Loading After a Kernel Update on Ubuntu

How to Fix Nvidia Drivers Not Loading After a Kernel Update on Ubuntu

Diagnose NVIDIA driver failures after an Ubuntu kernel update. Check DKMS and Secure Boot, rebuild the matching module, enroll a MOK, and verify the fix.

How to Fix Ubuntu 24.04 Wi-Fi Disconnecting After Suspend

How to Fix Ubuntu 24.04 Wi-Fi Disconnecting After Suspend

Fix Ubuntu 24.04 Wi-Fi drops after suspend with checks for NetworkManager, radio blocks, updates, power saving, and drivers—then verify each resume.

Fix High CPU Usage by Tracker-Miner-3 in Ubuntu GNOME

Fix High CPU Usage by Tracker-Miner-3 in Ubuntu GNOME

Learn why tracker-miner-fs-3 uses high CPU in Ubuntu GNOME and how to check indexing, exclude folders, update Ubuntu, or safely rebuild the search index.

Fix “No Bootable Device Found” After Installing Debian on UEFI

Fix “No Bootable Device Found” After Installing Debian on UEFI

Fix Debian’s UEFI boot error by checking boot mode, the EFI System Partition, GRUB files, and firmware boot order—without reinstalling Debian first.

Outlook Inbox Repair Tool

Outlook Inbox Repair Tool

The Outlook Inbox Repair Tool fixes corrupted PST files quickly so you can recover emails and restore normal Outlook function. Follow these exact steps to run scanpst.exe without data loss.