Home
» PC Tips
»
3 AI-powered tools that make Windows 11s Photos app great
3 AI-powered tools that make Windows 11s Photos app great
For a while now, Microsoft has been steadily improving its “boring” Photos app, the default media viewer on Windows 11. Now, with the addition of a number of AI-powered features, high-quality photo editing is also accessible to everyone.
1. Generative AI app for photo editing
The Erase feature in the Photos app helps remove distracting elements — unwanted people or objects in the background, as well as blemishes or blemishes on the subject.
This feature uses AI to fill in the erased area and image processing to intelligently blend the background. The app uses advanced Machine Learning to estimate what the pixels would look like if the object weren't there.
The app then generates natural-looking, undetectable content based on its surroundings. This is done locally on the device, and Microsoft guarantees that your data never leaves the device.
Here's how to use the Erase feature to remove objects from a photo:
Open the photo in the Photos app and select the Edit option .
Select Erase from the available toolset.
Adjust the Brush size and highlight the object or area you want to erase. The Generative Erase feature will apply the effect as you make brush strokes.
To apply the effect manually, set Auto apply to Off , then use the brush tool to select the object or area you want to erase. Next, use Add mask to select where you want to apply it, and Remove mask to deselect the areas you don't want to apply it. When you're done, click Erase and the Generative Erase effect will apply to the selected area.
Erase feature in Photos app on Windows 11
The Erase feature is an AI-powered evolution of the old Spot fix tool — the former produces more seamless and realistic results. It offers an easy way to make your photos look higher quality without using advanced photo editing software.
2. Makes background editing easy
You can also easily add a professional touch to your photos with the app's myriad of background editing capabilities.
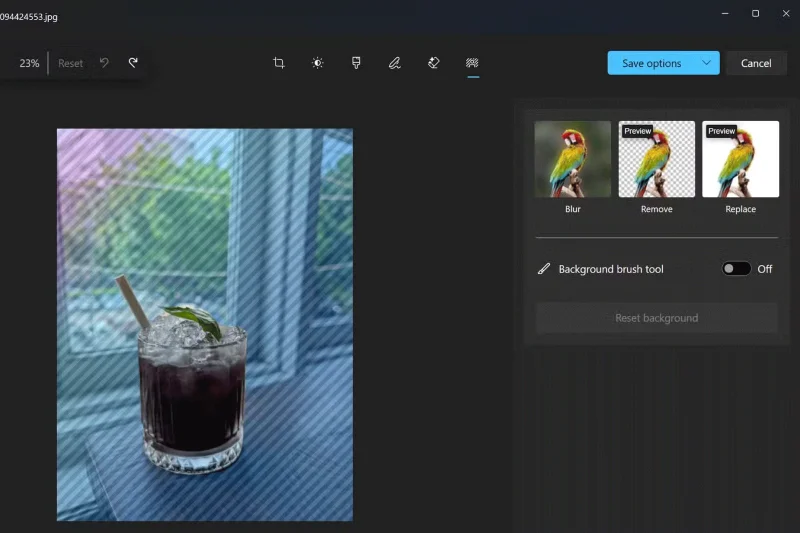
Initially, the app offered a Background Blur feature that could enhance photos by separating the subject from the background. This feature created an effect similar to using portrait mode in smartphone photography. However, the Photos app now lets you easily remove that isolated background or replace it with a different color.
Follow these steps to separate the subject from the background in a photo, then apply a blur effect to the background, replace it, or remove it completely:
Open the photo in the Photos app and select the Edit option .
Select Background . The background of the image will be automatically recognized and highlighted.
You can also turn on the Background brush tool to adjust the Brush size and Brush softness . Use Add mask to add more areas as part of the background or Remove mask to remove parts of the selected area.
Once you have identified the correct background, select Blur , Remove , or Replace .
Select the Blur option , then use the slider to adjust the Blur intensity .
Select the Remove option to remove the background of the photo.
Select the Replace option , then use the color palette to select a background color. You can also specify a hex color code or RGB value for the desired color.
Modify the background of the image
Just like the Erase feature, this process is completely local and the data will never leave your device.
3. Improve low quality photos
Super resolution is a handy feature to enhance and enlarge low resolution and quality photos to improve old, distorted photos or to print large size photos.
Super resolution uses AI to upscale photos to 8 times their original size. It essentially increases the number of pixels in an image, converting it from a low resolution to a higher resolution.
This feature makes the photo larger and suitable for printing or viewing on a larger screen. Super resolution can also be used to improve the quality of the photo, making it look sharper and clearer. However, the results may not be as expected.
Upgrade and improve photos in the Photos app with Super resolution using these steps:
Open the photo in the Photos app and select the Edit option .
Select Super resolution from the available editing options.
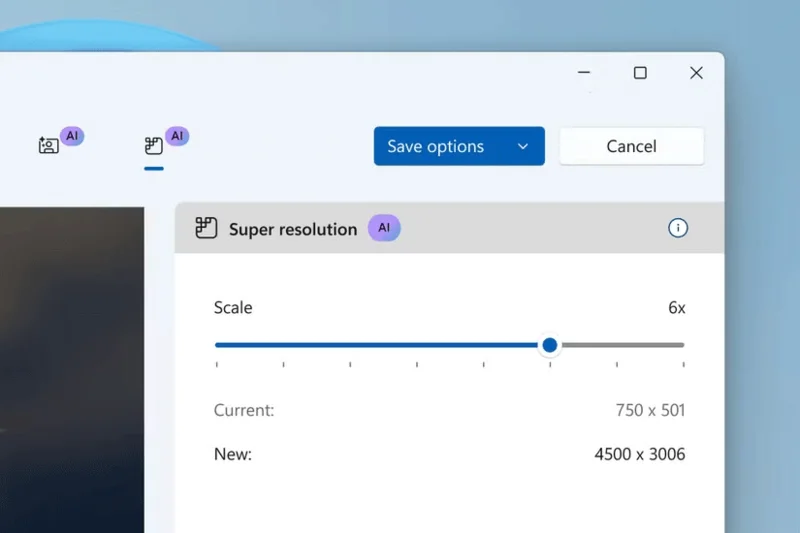
With the Scale slider , select the desired level of improvement.
Once the photo is enhanced, you'll see a before (original photo) and after (enhanced photo) preview for visual comparison.
Enhance photos with Super resolution in the Photos app
Note, Super resolution in Photos is exclusive to PC Copilot+. It leverages the Neural Processing Unit (NPU) on your PC Copilot+ to enhance photos efficiently – locally on your PC, that is.
Note :
Super resolution in Photos, along with a host of new AI experiences for PC Copilot+, is part of the Windows 11 2024 update (also known as Windows 11, version 24H2) and subsequent app updates from the Microsoft Store.
The feature preview for Snapdragon-powered Copilot+ PCs has been made available to Windows Insiders on Windows 11. While the update is officially available now, there will be a phased rollout to select devices and markets starting November 1.
Recent improvements to the Photos app on Windows 11, along with iCloud and OneDrive integration, have made it a handy photo editing tool. Most casual users don’t need a third-party app for basic photo editing. That’s especially true now that Microsoft has built these AI-powered features into Windows for free.