How to add Paintbrush effects to images in Microsoft PowerPoint

Microsoft PowerPoint 2016 can be an interesting visual effect creation tool if you know how to combine its features. The following article will show you how to create interesting paintbrush effects on all images in PowerPoint of Microsoft Office .

Microsoft PowerPoint doesn't have as many brushes as Adobe Photoshop . Therefore, this is the ideal alternative for you:

First, use an existing style or download your favorite free brush font to your computer. Then convert the selected font into a shape and use it to hide and partially save the image.

How to add Paintbrush effects to images in Microsoft PowerPoint

Instructions for creating brush effects in photos in Microsoft PowerPoint

Step 1: Convert the font into a shape

How to add Paintbrush effects to images in Microsoft PowerPoint

  1. Download the free paintbrush font and install it. This tutorial uses the Rush Brush font.
  2. Open a blank slide and type capital letter I (or any letter you want). Increase font size.
  3. Go to Insert> Illustrations> Shape . To convert the font into a shape, draw any shape (for example, a rectangle) that cover the letter. Then go to Drawing Tools> Format> Shape Outline> No Outline .
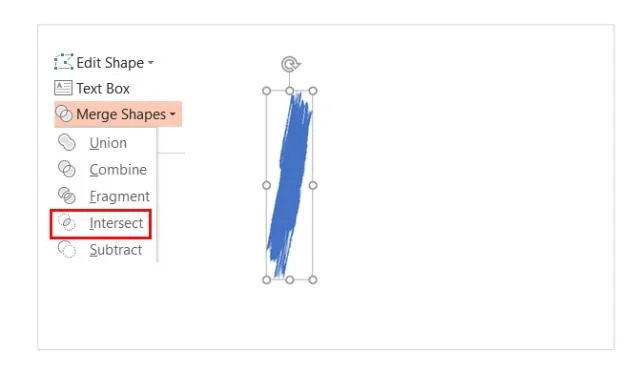
  4. Select the picture and the letter. Go to Drawing Tools> Format> Insert Shapes group> tap Merge Shapes> Select Intersect .
  5. Fonts and shapes intersect into a new one. This will be the paintbrush design block. You can tweak it as usual, such as increase the size or rotate it.

Step 2: Create the Paintbrush strokes

You can now group shapes and add photos or color after them to create slides that contain photo effects. The photo above used the image hidden under the brush stroke.

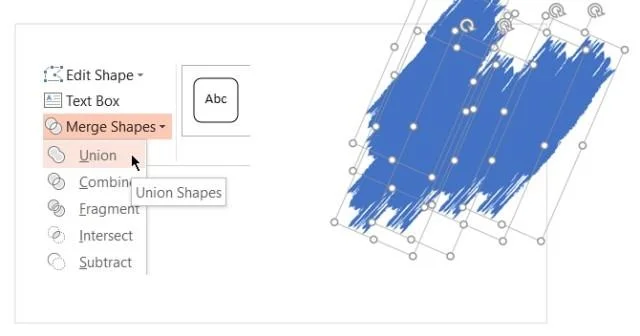
  • Duplicate the brush stroke shape to assemble them into a pattern. Press Ctrl + A to select all and then go to Format> Merge Shapes> Union and group them into a combined shape.

How to add Paintbrush effects to images in Microsoft PowerPoint

  • To create a mask that overlaps the image, inserts a rectangle. Select Shape Outline> No Outline . Then right-click on the rectangle and choose Send to Back> Send Backward from the menu.
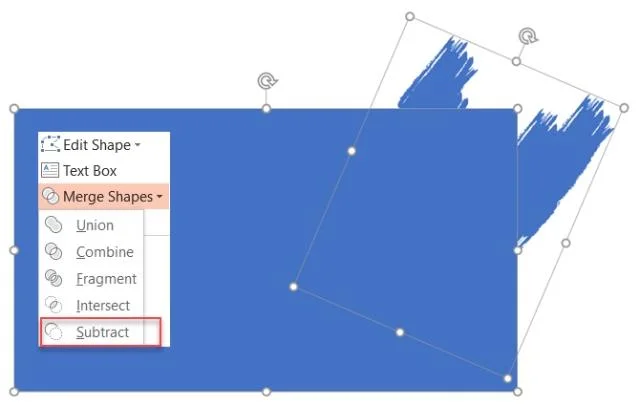
  • Now " Subtract " shape the font from rectangle to make transparent hole. Select the first rectangle and then the font shape. Go to Format> Merge Shapes> Subtract .

How to add Paintbrush effects to images in Microsoft PowerPoint

  • Choose a rectangle color that matches the slide color. For example, white.
  • Insert pictures into slides. Again, choose Send to Back> Send Backward . Now the rectangle acts as a layer mask outside the Subtract area as a frame.

You can drag the image to the position you want to place the frame.

Microsoft PowerPoint can help you do many things. It is not difficult to learn Microsoft PowerPoint even if you are a beginner! Don't be afraid to try this tip to make your presentation more engaging.
Leave a Comment

How to Use Windows 11 Quick Assist for Help

How to Use Windows 11 Quick Assist for Help

Discover how to use Windows 11 Quick Assist for seamless remote support. Learn step-by-step setup, troubleshooting, and tips to help friends or family with tech issues instantly.

Troubleshooting Windows 11 Dual Monitor Lag Fixes

Troubleshooting Windows 11 Dual Monitor Lag Fixes

Struggling with dual monitor lag on Windows 11? Discover proven troubleshooting fixes to eliminate stuttering, delays, and performance issues for seamless multi-monitor setups. Step-by-step guide inside.

How to Fix Windows 11 Startup Settings Blank Error

How to Fix Windows 11 Startup Settings Blank Error

Struggling with the frustrating Windows 11 "Startup Settings" blank error? Discover proven, step-by-step fixes to restore your boot options quickly and get your PC running smoothly again. No tech expertise needed!

How to Activate Windows 11 Enterprise with KMS

How to Activate Windows 11 Enterprise with KMS

Discover how to activate Windows 11 Enterprise using KMS effortlessly. This comprehensive guide covers everything from requirements to troubleshooting, ensuring seamless activation for your business needs.

How to Fix Windows 11 Kmode Exception Not Handled

How to Fix Windows 11 Kmode Exception Not Handled

Struggling with the dreaded KMODE EXCEPTION NOT HANDLED error on Windows 11? Discover proven, step-by-step fixes to resolve this blue screen nightmare quickly and get your PC running smoothly again. No tech expertise needed!

Troubleshooting Windows 11 Motherboard Driver Error Fix

Troubleshooting Windows 11 Motherboard Driver Error Fix

Struggling with Windows 11 "Motherboard" Driver Error? Discover proven troubleshooting steps to fix it fast and get your PC running smoothly again. Easy, step-by-step guide for beginners.

How to Fix Windows 11 Ping Spikes Over Wi-Fi Fixes

How to Fix Windows 11 Ping Spikes Over Wi-Fi Fixes

Struggling with ping spikes on Windows 11 over Wi-Fi? Discover proven fixes to stabilize your connection, reduce lag, and enjoy smooth gaming or streaming. Step-by-step solutions for instant results.

How to Recover Deleted Photos in Windows 11

How to Recover Deleted Photos in Windows 11

Accidentally deleted precious photos? Discover proven methods to recover deleted photos in Windows 11 effortlessly. Step-by-step guides, tools, and tips to restore your images safely.

How to Use Windows 11 Terminal Instead of CMD

How to Use Windows 11 Terminal Instead of CMD

Discover how to use Windows 11 Terminal instead of CMD for a modern, efficient command-line interface. Learn installation, setup, and tips to boost your productivity with tabs, themes, and more.

How to Activate Windows 11 Pro Without a Product Key

How to Activate Windows 11 Pro Without a Product Key

Discover safe, legitimate ways to activate Windows 11 Pro without a product key. Learn step-by-step methods using built-in tools and official Microsoft options to get your OS up and running smoothly. No risks, no hassle – just pure productivity.